In this part I will be sharing what I actually learned at this course. At the first lesson the attendees are asked to bring 6 cookies that are flat to decorate in class. Most of this class is demonstration and lecture by the instructor. My instructor’s name was Rebecca and she is a very helpful, knowledgeable lady. She started with showing us how to make the Wilton butter cream icing (scroll down for the recipe). She showed us how to differentiate between stiff, medium and thin icing. I’ll tell you this, I am still struggling with finding that right consistency for each of these levels. We decorated our cookies with a star tip – I can’t remember which one but it was either #16 or #18. Unfortunately I forgot to take pictures of the cookies.
For the second lesson we had to bring an 8″ round cake iced and ready to be decorated along with some icing for decorating. We first practiced some basic decorations using the small star tips like #16 and #18 and also the round tip #12.

This is my first decorated cake of the course. I had some issues with icing of the cake because it was not thin enough as I realized later. Also there were crumbs visible on the sides of the cake.
For the 3rd lesson we decorated cupcakes. We had to take 6 cupcakes and we decorated them with different techniques and we also learnt how to make the ribbon rose. You do have to get your icing consistency right to have a nice looking flower. And lets just say, I definitely did not have the right consistency. For this course we used tips #16, #18, #1M, #2D, #12, #104 and #352.
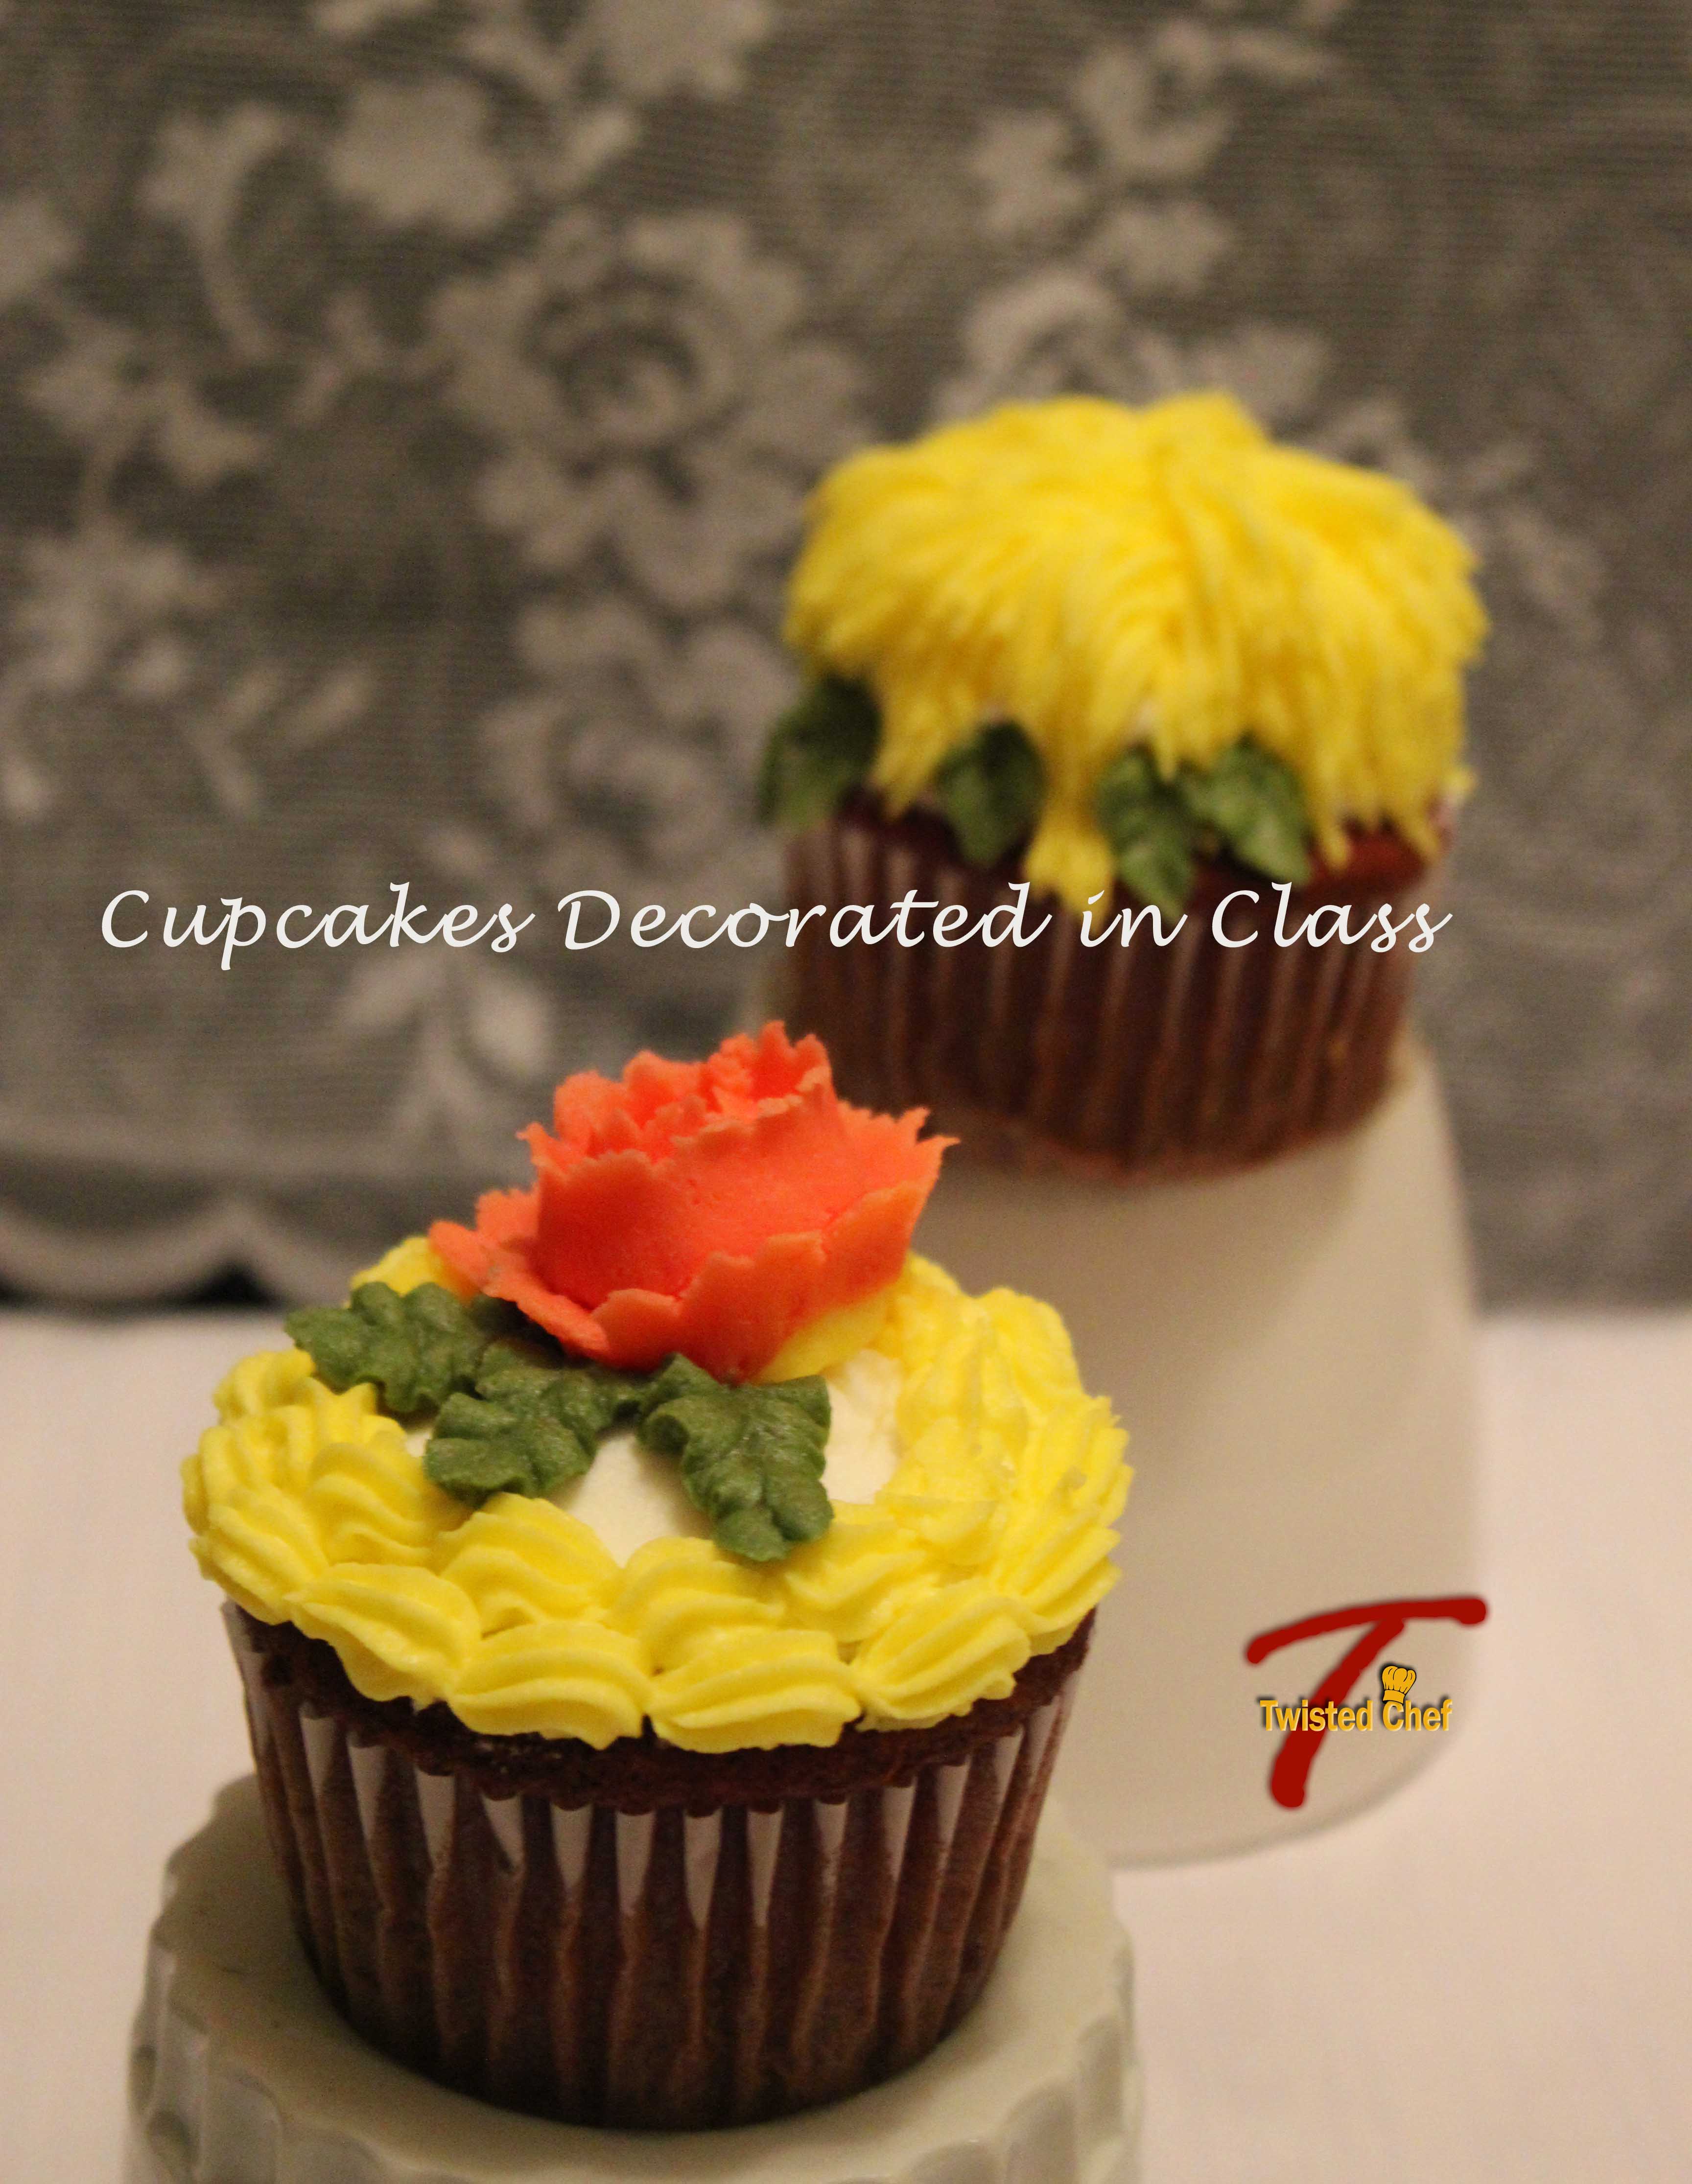
We decorated 6 cupcakes. These are samples of what I did with my cupcakes. Here you can see the shaggy mums, the rose, leaves and a shell border.
The fourth and final lesson involved bringing a double layer cake, iced and ready to be decorated. Our class was special as they were trying to see if a group can learn to make the Wilton rose during the first course rather than the 2nd one. It is not that difficult if your icing is the right consistency. I again had trouble with the icing consistency and my flowers looked horrendous. Tips used were #16, #18, #3, #12, #104 and #352.
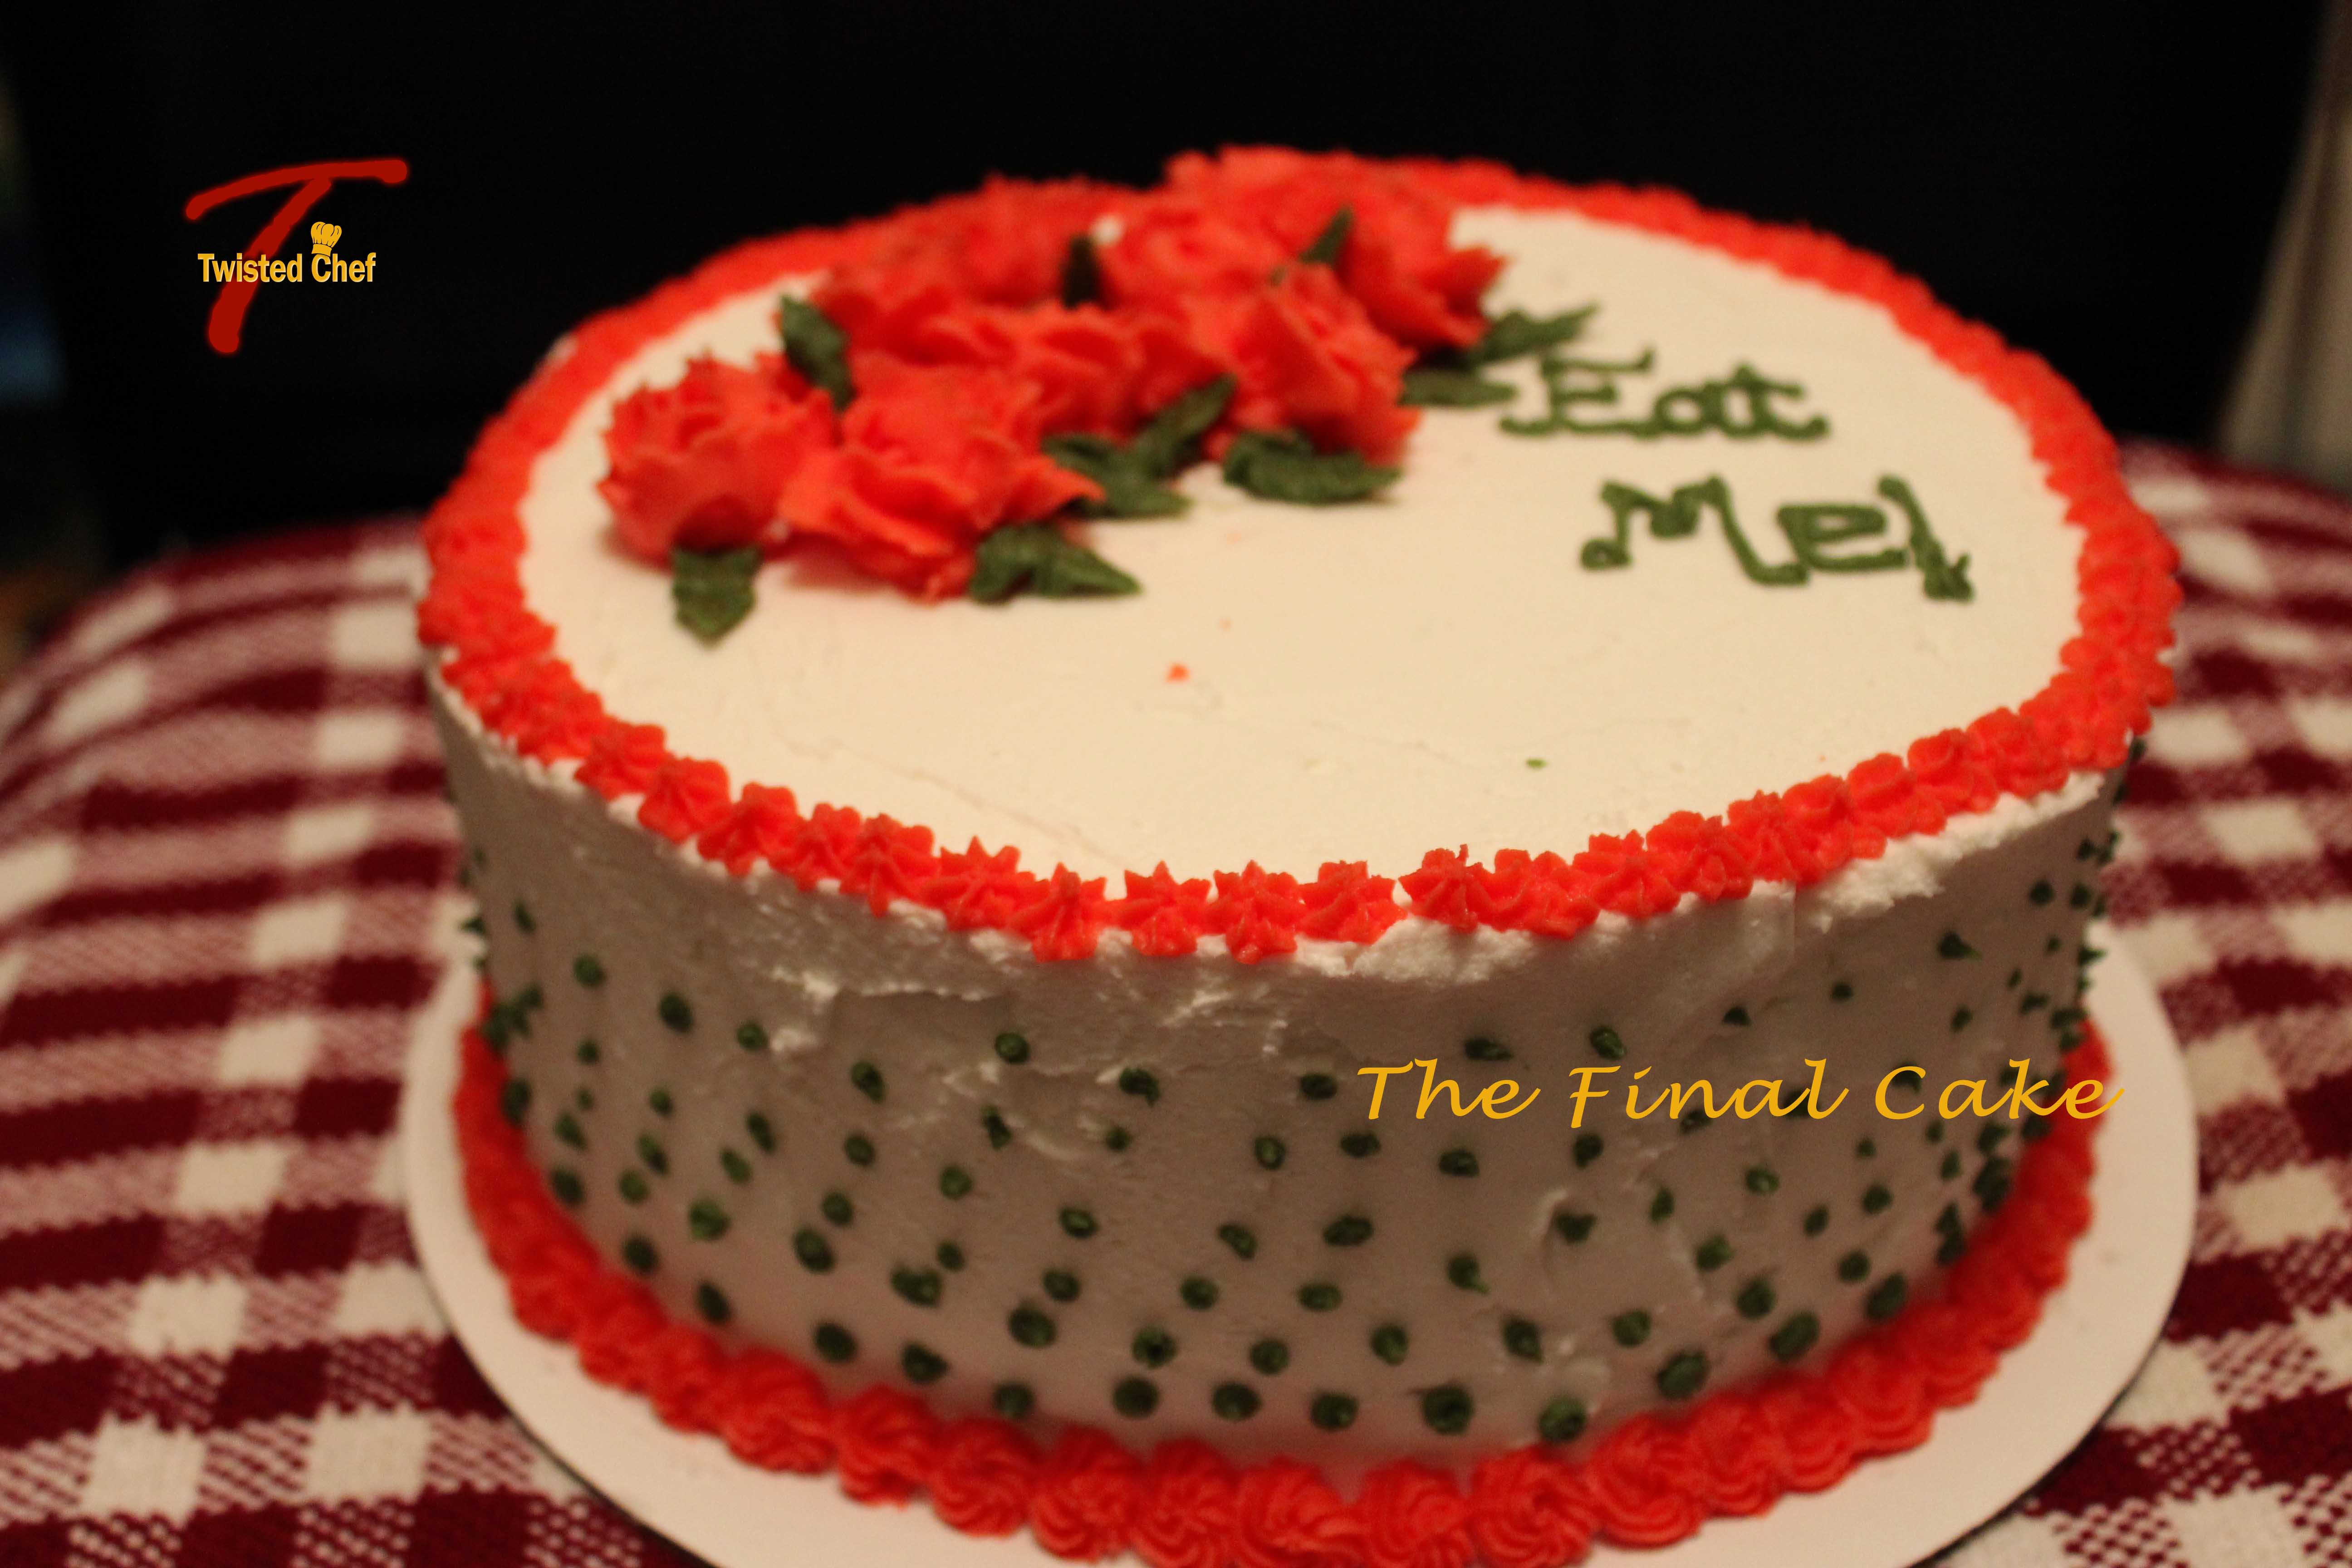
This was my final cake for this course. My icing was not the right consistency for the flowers so I had a really difficult time doing the roses. It was too stiff. But it seemed that people who saw it all liked it so I guess I didn’t do too bad of a job. 🙂
Over all this was a great course that I enjoyed very much. We had a full class with 9 wonderful people and we definitely had fun! Here is a group photo of all of us with our instructor and our final cake!

This is a picture of the whole class with our instructor. You can see all of the finished cakes and the participants with their certificates 🙂
Here is the recipe for the icing.
Wilton Butter Cream Icing
Ingredients:
1 cup solid white vegetable shortening (this is important, if you want your icing to be white and taste good)
1 teaspoon Wilton Flavour (imitation vanilla, almond or butter)
7-8 teaspoons milk or water (I prefer milk but water does just as well)
1 lb (about 4 cups) pure cane confectioners’ sugar (Icing sugar in other words)
1 tablespoon Wilton Meringue Powder
Pinch of salt (optional)
Cream the shortening. Add the flavouring of your choice. Add sugar and milk as required. Add the meringue powder and whip some more. Keep whipping until you reach desired fluffy, creamy frosting. Adjust liquid and sugar to get the desired consistency.
The above recipe will give you a stiff icing and makes about 2 1/2 cups. For medium consistency, add 1 teaspoon water or milk for each cup of icing. For thin icing add 2 teaspoons liquid per cup of stiff icing.
Some tips and tricks learned during the course:
- the flavours are colourless so they won’t change your icing colour
- for flavours, use extracts and not oils.
- for the meringue powder, the instructor advised us that Wilton’s was the best product and no other would be as good, so I used this but will be trying out the other brand I bought from the bulk store to see what the difference is.
- 454 g of shortening = 2 cups
- shift your icing sugar so that there is no lumps
- always cover this icing as it will crust
- if you are colouring your icing use a little at a time and mix thoroughly before adding more. Use a toothpick for these colours and do not use the same toothpick twice as it will contaminate the colour
- your mixer should be at least 100 watt so that it doesn’t burn out making the icing
- use thin consistency to ice the cake
- I personally found that crumb coating the cake is the best way to prevent any crumbs from showing up on the finished product
- if using a filling for your cake, pipe the icing along the edges of the cake to create a “dam” so that the filling stays in place when you place the upper layer
- when icing your cake, make sure that the spatula does not touch the cake
- for the sides use the smaller spatula
- put your iced cake in the fridge for at least 1/2 hour before decorating it so that if you make a mistake it is easier to correct, and trust me, beginners are most likely to make mistakes (I know I did)
- icing can be stored at room temperature for 3 days, in refrigerator for 3 weeks and in the freezer for 3 months.
- if you want black icing, first make chocolate icing using cocoa and then add black icing colour so that you are not using too much food colouring and it tastes better
- when icing or transporting your iced cake, try putting a little piece of shelf-liner between the cake board and the turntable or cake board and the carrying box or your car seat and the carrying box – this will prevent it from sliding off
Wilton icing is available ready made for purchase at stores that carry cake decorating materials.

Ready made icing for those that do not want to make their own.


Great post. I’m experiencing a few of these issues as well..
Hi. I’m gonna start my Wilton decorating class 1. Can you suggest which brand or store I can get flat cookies? I’m just new here in Canada. Thanks in advance.
On Monday, I saw a kit at Walmart that had cookies and some decorations. The kit is meant for people who want to decorate the cookies. You can get one of those packs and just use the cookies. Or buy any cookie with a flat top like shortbread cookies. Or buy some cookie dough from you local grocery and bake them at home. My instructor was not very strict about what cookie they were. As long as they had a level top. Hope this helps and good luck with you classes. I am sure you will enjoy them 😀
my iced cake still does not come out smooth, as much as I try. why?
Are you using the wilton buttercream recipe? If so, then you can let sit for about 30 min to 60 min in the fridge (the icing on the cake should have formed a crust by now and should not come off if you touch it lightly) and then take a large enough piece of waxed paper and place on top of the iced cake. use the palm of your hand on top of the waxed paper to smooth it out. If the icing starts to stick to the paper, put the cake back in the fridge and repeat.
If you are using a non-crust forming icing, then just make sure you have a lot of icing on the cake before you start to smooth. During the process of making it smooth, you will remove most of the excess icing. Be patient and practice. If you do not have a turn table, I highly recommend investing in one, even if it is a cheap one. It helps quite a bit. Hope it helps. If not, next time you ice a cake, take a picture and drop me a line with the picture and I will have a better idea as to how to help you further. Good luck 🙂
I use the icing that is in the tub. I will put it in the refrigerator the next time I make a cake. Thank you so much and I will take a picture of the next time I make one. I make one once a week trying to get my roses to come out right.
Chef T
How do I get Fondant to come out straight on my cake
Pingback: Cake Trimmings (Flowers) | familyrecipebooks·
Pingback: Wilton Cake Decorating Course 3: Gum Paste and Fondant | Culinary Adventures of The Twisted Chef T·
Very lovely bakes you have there!
Thank you 🙂
Pingback: Fluffy Reese’s Cake | Beautiful Disasters·